Showing posts with label Tutorial. Show all posts

Friday, 8 March 2013

Purple Peek-a-Boo!

I'm sorry about the awful hair!

I haven't done a makeup post in a while and thought I would share what I wore out the other evening with you. It's a simple golden brown eye with a hint of colour using a purple liner.

So, let's get into it…

Face

My base consisted of my new NARS Sheer Glow. I tried to cover up my blemishes using my trusty MAC Studio Finish Concealer. I don't know why but my skin hasn't been looking that great =( but it's getting better. I used my Bare Minerals Mineral Veil to set everything. I did this after the eye makeup.

I used Sleeks blush in 'Coral' to add a touch of colour to my cheeks, you can contour if you like, but I chose not to.

Eyes

First I started by priming my eyes with Urban Decays Primer Potion.

Using a flat eyeshadow brush I packed on MACs 'Romp' to give me a good base to work with.

Next using the other side of the same brush pack on MACs 'Amberlights' eyeshadow and place in the inner corner and blend into the Romp.

Using the same brush pick up a mix of MACs 'Embark' and 'Antiqued' and place on the outer third of the eye and blend using a blending brush.

With what's left on the brush, gently blend into the crease, all the way in. Also, drag the excess underneath the eye.

Keep going with the packing on colour and blending until you are happy with the intensity

Now for the pop of colour, using Maybellines EyeStudio Gel Liner in 'Eggplant Aubergine'(it can be pencil or gel, whatever you have) draw a thin line all along the upper lash line

Build the colour on the outer edge and using a pencil brush blend to create a haze. Again, keep adding till you get the desired intensity.

Apply Mascara and you're done, I used the L'oreal Voluminous Extra-Volume Collagen.

Lips

I just used my MAC lippy in 'mocha', I choose this because I didn't want a pinky lip to distract from the purple in the eye.

And there you have it, using a different coloured liner is a nice way to change out a normal everyday eyeshadow look. You could even do this using matte colours, if you're not into shimmery colours on the lid.

Hope you enjoyed.

♥ RP ♥

Saturday, 24 November 2012

Purple Thunder Storm!

Finally, another make up post. I don't know how many of you really enjoy reading such posts, but I sure do like doing them. I just had the urge to do a purple smokey eye. I find that purple is such a lovely colour to wear if you have brown eyes. With the festive season truly here, this would be a great evening look. Now let's get to it…

Face

I just used my MUFE HD foundation all over the face and down my neck. Used my well loved MAC studio finish concealer in NC42 to cover my blemishes and bags. On the tops of my cheeks I used Illamasqua's powder blush in 'Create'.

Eyes

I primed my lids using Urban Decays primer potion. Then applied the Avon supershock eyeliner in 'Plumful' to the inner half of my lid to intensify any colour that I put on top of it.

Using a flat eyeshadow brush I packed my Inglot shadow in (the purple) '446 Pearl', (sexy name ;-)) onto the inner half of the lid, where the eye pencil was.

Then using the other side of the brush I packed on NYX shadow in 'Sensual' and placed it on the outter half of my lid. I dragged any excess underneath the eye.

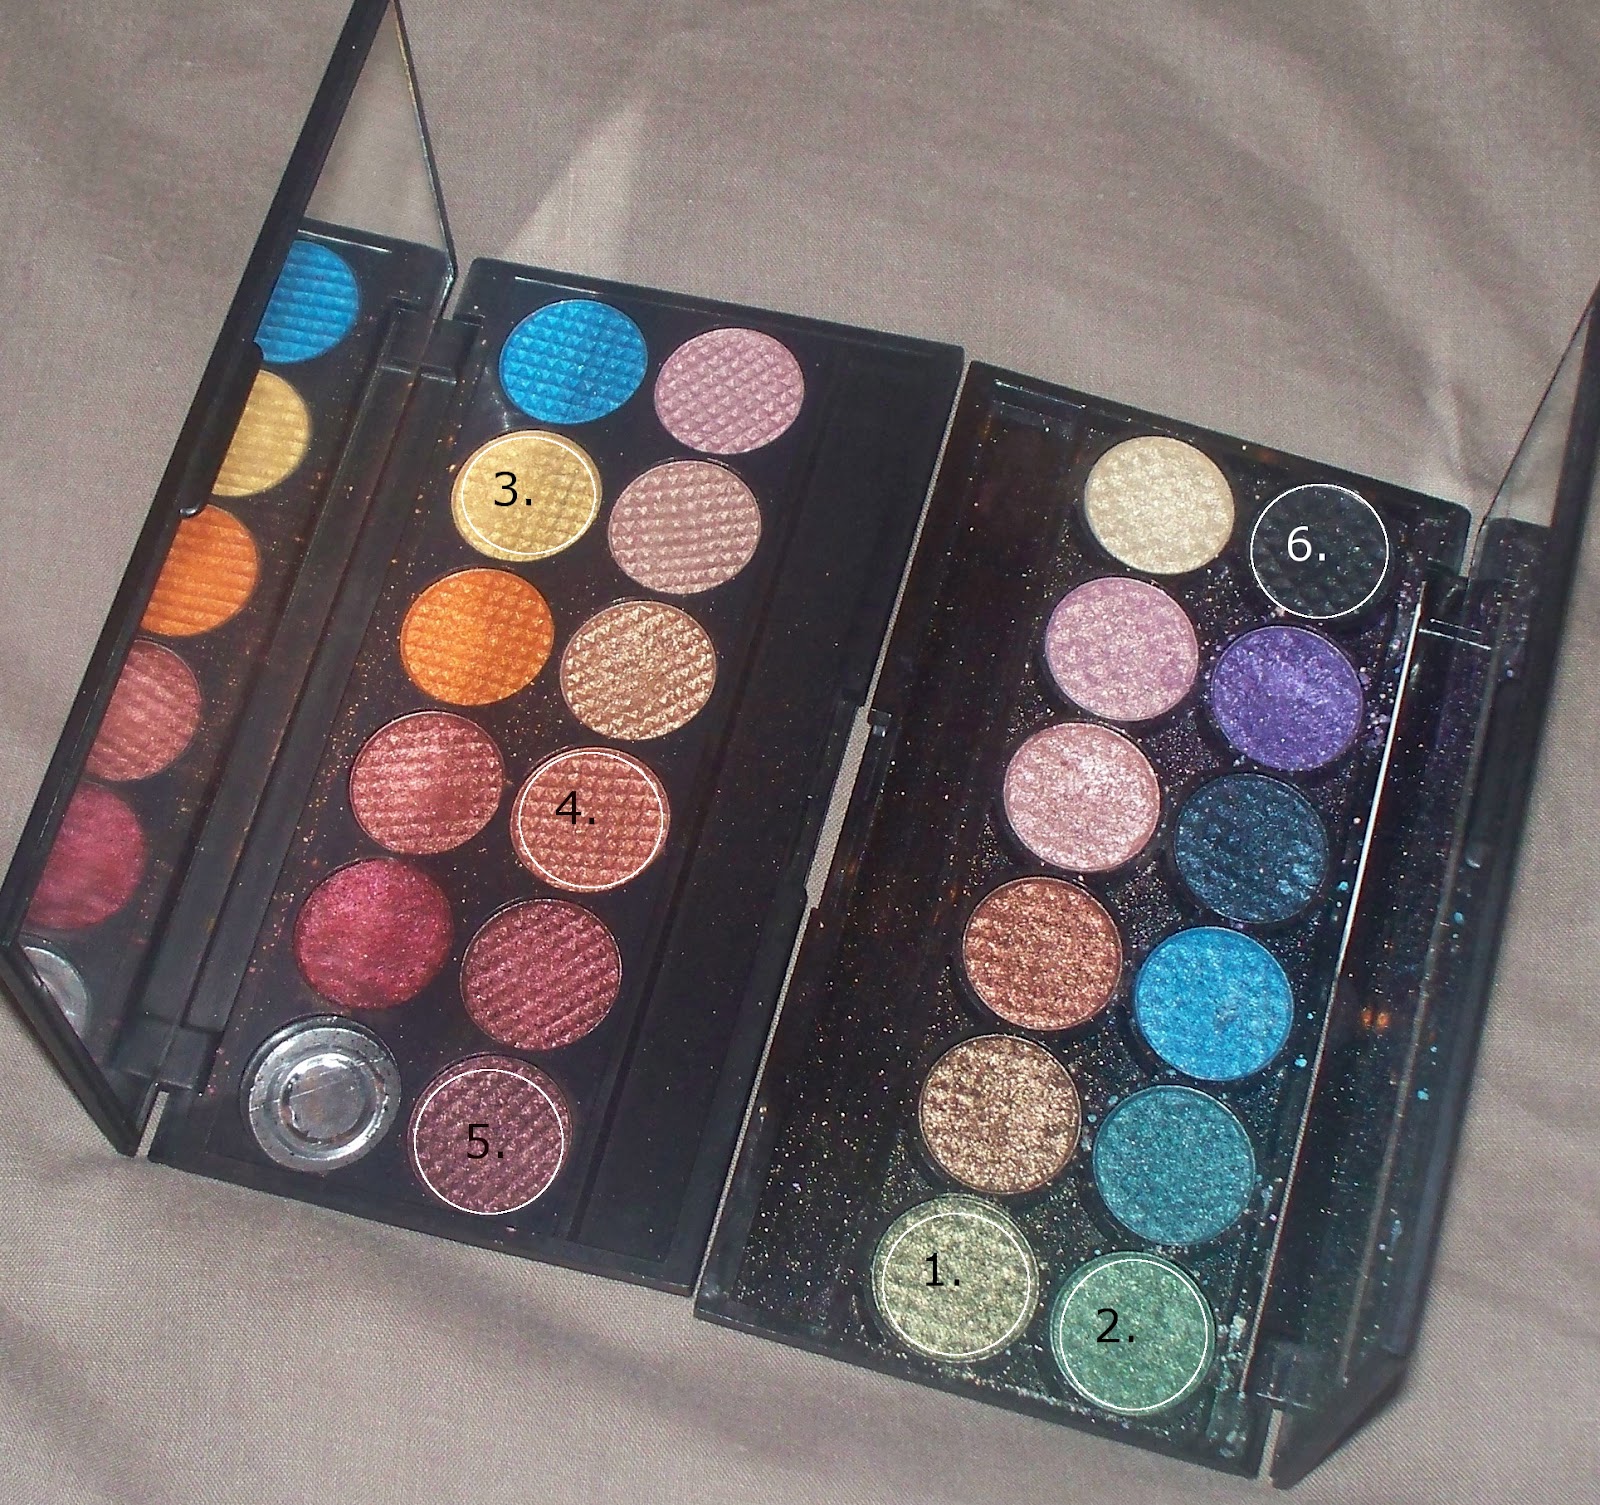
Using a pencil brush I picked up, what I have labeled as, (3) from my sunset sleek palette and lightly placed it along the crease of my eye to add a hint of warmth to the eye.

Using my Inglot shadow in (the gold) '405 Pearl' I placed the colour on the inner corners of the eye to draw some light in.

Finally I thinly lined my upper eyelid with the Collection (2000) Extreme Eyeliner in black, used my Avon Super shock eyeliner in black in my waterline and applied my No.7 Extravagent Volume mascara.

Lips

I just smudged in this No.7 lip liner in 'Melon'.

And there you have it. Now looking at it I may have smudged some black shadow on top the liner that I did and maybe dragged some black underneath the eye as well, but it just depends where you are wearing it. Hope you guys liked it! =D

♥ RP ♥

Thursday, 4 October 2012

Turning over a new Leaf!

The Autumn coolness is settling in and the crisp mornings are taking hold, it all sounds so romantic. I love this time of year, the changing of the season; so obvious and beautiful. The changing leaves are my inspiration for this look, if you follow me on instagram (@Rohini_patel) you will have seen me post this picture of a tree that's outside my house, the leaves have just started to change to their autumnal colours, I love these earthy tones.

With those colours in mind I decided to get my trusted sleek palettes out to see if I could create something and of course all the colours I wanted were there in those palettes.

Products used:

Face:
MAC Studio Fix Fluid (NC42)
MAC Studio Finish Concealer (NC42)
NARS Multiple in 'South Beach'

Lips:
Models own Balm in 'Pomegranate'


Eyes:
Sleek palettes in 'Original' and 'Sunset'
Avon Super shock liner in 'Black'
No 7 Extravagant Lashes in 'Black'

Eyes, how to:

I started by placing all the colours where I wanted them to be. So using a small brush I placed the 'Grass Green' (No.1) in my inner tear duct area. Next to that I put the other 'Moss Green' (No.2), I didn't put too much of this colour as I just wanted to use it as a transitional colour.

Using the amber colour (no.4) across the rest of my lid using a flat eye shadow brush. I found that between the green and amber colour I needed something else so I used the 'Yellow' (No.3) from the sunset palette to keep the colours fluid (using the smaller brush).

To deepen the outer corner I used the 'Burnt Red' colour (No.5) and created a 'V' shape to give some depth to the eye (using the tip of the flat eye shadow brush).

Keep Blending and adding colours as you see fit, you don't always get the intensity that you want with one application and the colours sometimes fade when you have blended.

Try not to over blend, otherwise the colours will blob into one and it will look messy. Just use gentle strokes to get the fluidity that you want.

I still wanted it to be darker to using the 'Black' (No.6) I lined the outer half of my lash line (using an angled brush). It was too dark now, so I went back in with the 'Burnt Red' (No.5) going over the top of the black.

I dragged whatever remained of the 'Burnt Red' underneath the eye.

I lined my water line with the Super shock Liner.

Apply lashings of Mascara.

Cheeks:

Just got the NARS Multiple placed it on the apples of my cheeks and blended using my Real Techniques contour brush. Love this colour, warms up the face so nicely, definitely going to be making more use of this with the weather turning.

Lips:

Thought that a deep red would be well suited with the rest of the tones in the looks but didn't want to use a solid colour so this balm was perfect.

The pictures didn't turn out as sharp as I wanted due to may hap hazard picture taking and the lighting was fading.

But I hope you enjoyed this! Are you happy that Autumn is coming, or are you a summer baby?? Till Next time, bundle up warm and have a cup of cocoa!!

♥ RP ♥

Sunday, 16 September 2012

Acid Flower Bomb!

When I was 18/19 and I first got started into makeup I used to love experimenting with coloured shadows! But in the last year or so I have slowly started to get into wearing Neutrals when I go out.

I have this blouse...there is a picture further down. And I loved the colour combination of the flowers that I wanted to see if I had the colours to create a ‘look’. Low and behold I have the sleek Caribbean palette (was limited edition) and it had all the colours!

I understand that it isn’t exactly a wearable look, it was just a bit of fun! So on to how to recreate it.

I don't know why but when I smile to the camera when taking pictures for these types of posts I look like a stalker! Lol! So you're stuck with pictures of me looking miserable! Sorry!

Face

I used the Jemma Kidd Light as Air foundation in 'medium beige'. And concealed my blemishes and eye bags with my MAC studio finish concealer in NC42.

Eyes

I used a primer first, any primer that you have will do, I used the Urban Decay primer potion.

Using a flat eyeshadow brush I packed the pink colour on the first half of my eye lid and into the inner corner of my eye.

Flipping the brush I packed the orange colour onto the outer half of my eye.

Using a fluffy blending brush I blended the middle so it would become fluid, I kept going into the colours and blending to get it to how I liked.

Using a pencil brush I picked up the red colour and gently (I mean I barely put any pressure on the application) I drew a ‘V’ on the outer corner, dragging it over the top of the orange and part of the pink. I blended the colours together so there were no harsh lines.

I pulled the red colour underneath my eye with whatever was left on the brush.

Using an angled brush I picked up the purple and lined the upper lash line. Whatever was left on the brush I put on my lower lash line.

I then curled my lashes and put on the mascara and lined my waterline.

Cheeks

All I used was my sleek contour kit to sculpt my face; so that’s underneath my cheek bone, my jaw and around my temples.

Lips

I wanted to keep them nude considering the eyes, so I used my ELF matte Lip colour in tea rose (which I absolutely love!).

There you have it =) I think I need to get out of my neutrals funk and bring out the colours! Hope you enjoyed that!

♥ RP ♥

Friday, 27 April 2012

Rusty Eye!

Hello my lovelies! I am sure most of you have already seen this, but I have only gone a wrote a guest post on Ruby's (It's a Beautyful Life) Blog!

I did a little make up look. Please have a look if you haven't already!

I would just like to thank Ruby for letting me write a post for her lovely Blog! If you haven't had a look at her blog...what are you waiting for?! *Link*

=) x

Related Posts Plugin for WordPress, Blogger...